Saturday, October 29, 2005

My first measured 60 shot series

I tend I like just shooting away and measuring my outcomes on a daily basis. I just like shooting air pistol. I dont have time to compete at the moment so I hadn't bothered to see how I'll stack up.

Today I thought I'd give a 60 shot run a go.

Now Typically, a 60 shot competition is spanned over 105 minutes, and you shoot one pellet into each clean target so that you know exactly what to score.

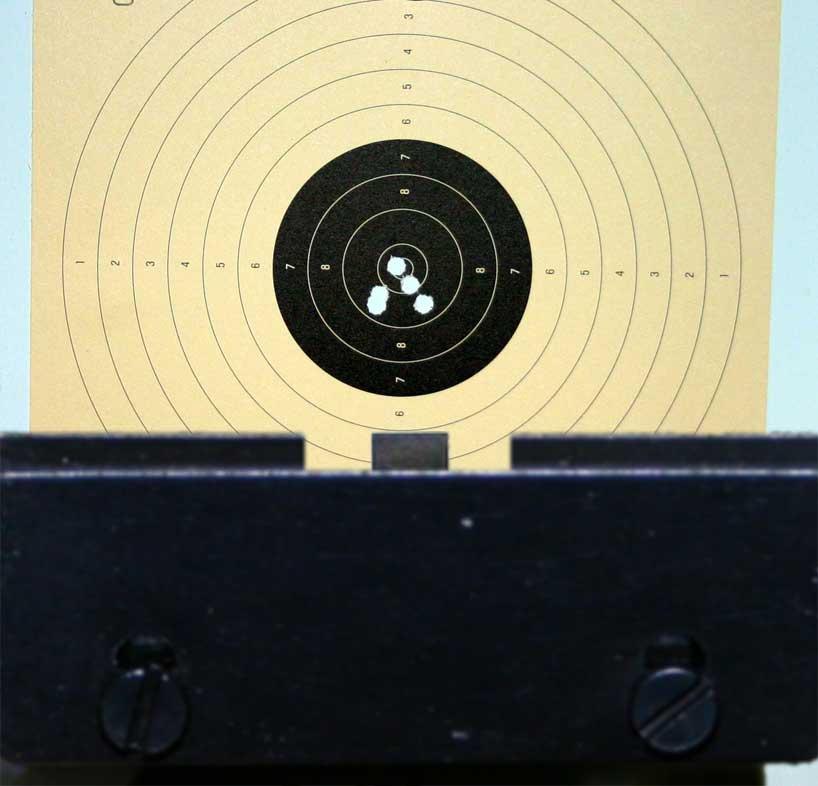
I shoot at home and don't have the luxury of a target changer, so I opted for 10 shots per target, and used the "if in doubt, score low" method of judgement.

I also was kinda short of time, and also curious to see what the pressure of rapid shooting would do to affect the scoring, so I shot the 60 in 30 minutes. Thats roughly 4 minutes per ten shots, plus target changing times, and score counting. In effect this means that It was load, raise. tick tick tick... shoot. Load raise.... Its damn tiring, and I think a bottle of powerade on the side would be a good idea.

My focus felt good today, but at that speed with that many shots I definately felt the bad shots. Over 60 I had a number 8's, and 7's. My overall score was 550/600 which I am not going to complain at with the pace I pushed. Had my 8's & 7's been in the normal 9 postion ( saying 10 would be greedy) then my score would have been around 12-20 points up. Still, I didn't and it wasn't. My plan is to do at least one full 60 shot measure per week to build up a consistent competion style of shooting and scoring.

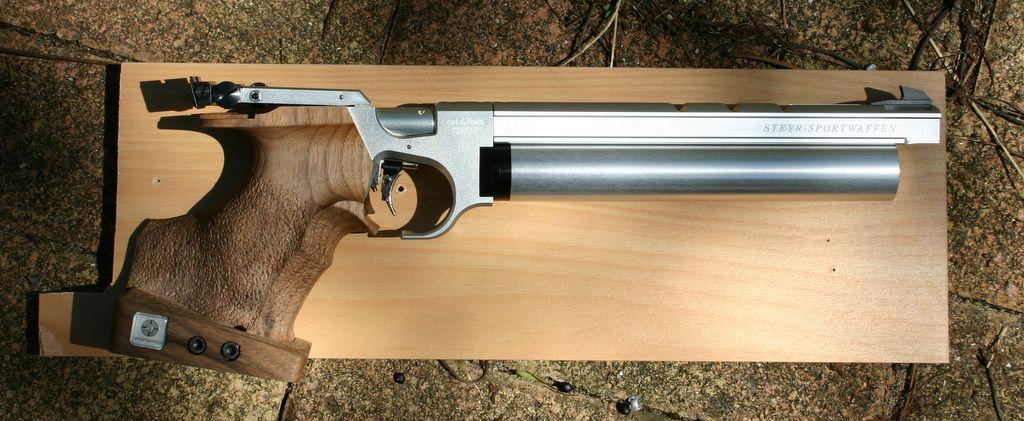
The Goal. I have been shooting with reasonable weekly practice for around 6 months now, and only for 1 month with a competition air pistol. I would like to set the goal of a 570 score for myself by the end of the year. It's best to set goals that push yourself hard without feeling impossible. All I need to gain this is a conversion of each of those rushed bad shots, and a maintenance of the 9's and 10's I'm getting now. Only time and training will tell.

Thursday, October 27, 2005

Sedentary Shooting

Today I was trialling the use of Sedentary Shooting and Dry Firing. I got up and went to shoot today after finally feeling like my grip adjustments were good and my shots just weren't like they were yesterday. I could've started to play with the gun and sights, but I could see a never ending spiral if I went down that track.

I got a stool, and a length of wood the right length to hold up my arm and I took a seat. Resting comfortably on the stool, I placed my arm on the wood ( a little wobbly, so I still had to use some balance.) The sights were nice and clean against the target and I spent a good effort making sure the sight was spaced correctly and pulled the trigger with no muzzle movement. Of Course I got a dead centre bullseye. In fact, I went a few more and peppered the bullseye. If for nothing else, this was worth while because of the confidence boost I was getting. I now knew that the gun was setup just fine, no tampering required.

Next, After lining up a new target, I got rid of the block of wood. and sat comfortably on the stool. I lined up the stool to closely replicate the angle I use when standing. I raised the arm and repeated the test. It was a little harder to keep it as steady, but the shots were still grouping in, or just around, the 10. So my eyes are ok, and my arm was steady enough!

The next test, of course, was to remove the stool as well, so that I was back to the standing position that had dumped so badly on my shots before. This time I paid attention to how my upperbody was relaxed and positioned on the stool. Were my legs too stiff? I tried putting a bend in my knees, and letting my upper body get the same "feel" as it was when sitting. My shots were better.

The real test is getting through tomorrow and seeing if I can apply the same test for the same results ;) It seems like this is a never ending story of adjustments. At least its damn enjoyable to do it.

Keep your focus on the sights

Its a thought that I see repeated all over the air pistol forums; Keep your focus on the sights. I have found that it is completely true. If you can keep your focus on the front sight and keep the front sight perfectly aligned in the rear sight..... and keep that entire setting in the correct aim spot while pulling the trigger... you'll get a 10.

There is a catch though, that I discovered today, to knaw at the unwary shooter. What if you have focused everything, and the shot feels right, but still isn't grouping well. This was happening to me today at my home range. First thing I did was boost the light on the target to a 75W lamp. This is plenty bright resting the lamp 4 feet from the target. I sighted again, and heres the catch; How I ever thought that I was focused on the front sight before is beyond me. Now it was sharp enough to cut, and the shots started pulling closer together.

A while later when I went back for a second practise, to try out the new found lighting conditions, I found the second catch. Eye fatigue, and relaxation. The first shot was nice and sharp, and so was each succesive shot (so I thought.) I soon realized that I was just a little too comfortable. My brain wasn't telling me what was happening because it was gradual, but I worked out that while I was still looking at the front sight, and the front sight was looking good, I wasn't Focused on it anymore. My comfort zone was also telling me that my arm was nice and straight, with a locked elbow, and strong wrist. Along with the eyes, my arm had gradually lost it's edge, like a camera view that is a minute twist off the focal point.

A Deep breath later, and some rapid blinking also, and I focused. I locked that arm damn hard. Hard enough that I knew it, the same way I was gripping the pistol tight with the primary 2 fingers. Hard-Tight, but not painful tight. I raised that vice-clamp up to shooting position, and did the same workover on my eyes. I didn't just look and see the front sight, I tried to push my eye ball into it. Straight away I got a 10 when my brain pulled the trigger for me.

This is where I normally start to fade, feeling that everything was setup for a group of 5. Not so. This time I did that ritual, and told my brain vocally (in my head vocally :) Lock Arm! Lock Wrist! Raise! Lock EyeBall! Hold! Fire! Like a drillmaster it worked a treat and the shots pulled off in a very tidy group.

Summary. When those top shooters out there say you need to focus on the sights, they were not kidding. What they didn't mention, and its really hard to describe without a litany like what I just wrote is the following; FOCUS on everything about that shot and don't focus on anything else. Repeat 60 times.

Wednesday, October 26, 2005

Standing in the comfort zone

This is an update to my last post. I put the air pistol aside for a couple of hours so that I could refresh myself, and then got the good idea to stand infront of a decent sized mirror so that I could actually see things. I was looking for the following things.
  • Where was my head and eye position.
  • Where was my body pointing.
  • Where was my arm pointing when it was most relaxed.
  • Which direction was the barrel now pointing.
  1. Head and Eyes. My personal belief is that the eye (I am right eyed/ right handed) should be directly face on to the target looking directly towards it without any head tilt or sideways deviation that can be avoided. The reasoning behind this is so that the eyeball is as close to centred in the socket as possible, removing as much muscular eye strain as possible by having it centered and relaxed. (There will be enough strain as it is focusing)
  2. Body Direction. Ideally I would like to be perpendicular to the target so that my locked arm is directly out from my body. Like most sedentry computer operaters, my neck doesn't like to rotate 90 degrees anymore. Instead it ends up with a strain or a tilt to get the eye in line. I can cheat to get it there, but its just hard to keep it in the same position, and subconsiously the arm and wrist try to compensate. My Technique; Starting position is face on to the mirror. Keeping the neck relaxed I rotate my feet position moving anticlockwise towards the right foot first perpendicular position. Keep doing this until you cant move any more without straining the neck to keep looking straight on at the mirror. I found that my natural inclination is only around 10 degrees of perpendicuar. and I am quite comfortable.
  3. Arm Position. This really needs to be done with pistol in hand. The goal here is to raise the arm, keeping it locked, and the wrist comfortably straight and inline with the arm (not the target) and when it is at target sighting height see where it is. The goal for me is that the right eye when facing firectly forward is exactly in line with the bullseye of the target. At this point I am trying to get the rearsights inline with my eye rather than the front sights. If I find that the position of the rearsights is not inline with my eye, then I readjust my feet, staying in the neck comfort zone, until a comfortable relaxed raising of my arm puts it inline with my eye. Results. For me I found that my relaxed arm position had my gun pointing off to the left so that I could not line up the front sights unless I made my arm position less comfortable, or by bending my wrist to the side. I wanted to avoid either.
  4. Barrel Direction. All things being equal, I can make the assumtion that I now had a very natural shooting position with Feet, Eyes, and Arm, and my only problem was that this made the barrel point nicely in line with my arm to aim 5-15 degrees to the left of my eye position on the bullseye. This is where a match pistol comes into its own with grip adjustments. I am not a fan of creating massive tilts on the grip in relation to barrel direction, because of the sideways force on trigger pull. In my case I loosened it up and twisted the barrel around to the right hand side as much as I could to compensate for my arms left inclination. Note that the grips do not allow a lot of right tilt; Moreso they have a lot of left tilt. (not sure why). I tried my position again and lifted the gun. Hey Presto. I could lift the gun so that my arm was completely straight with no subtle wrist tilting so that the gun barrel pointed down the direction of eye, to sights, to target with almost no visible twitching of any part of arm or wrist.
In Summary. The main goal I have now is just not releasing the shot when I know it is not optimal. Its just too much fun, even on the not so great shots, but that doesn't help train a good habit. Each time I raise the arm I do the following.
  1. Check body position.
  2. Place head straight face on to the target with the right eye perfectly aligned to the Bull (well, as perfect as perceived).
  3. Focus on the bull as I raise the relaxed arm to shooting height (This is so that I don't accidentally move the arm position)
  4. Check the sights are comfortably straight with the eye and directly in line with the bull. (If the sights are not straight; STOP and adjust feet and body. If the Sights are straight, but not inline with the bull; STOP and move body until they are.)
  5. When everything feels perfect keep the perfect picture until the trigger just happens to draw fire.
Finally. These summaries are a lot for myself, and I hope they help you. Remember that all these things are open to personal adjustment so that it feels right.

Tuesday, October 25, 2005

The best way to stand

Today I spent a good portion of time looking at my standing position in relation to the target. A lot of the time I will try a position that seems uncomfortable, yet gets a good number of accurate shots. At other times I'll try a more comfortable position, only to find the shots less well grouped. I sometimes think that its simply stiff muscles a lot of the time, and need to make sure that I am well stretched.

The position I seem to go back to the most is standing perpendicular to the target, feet positioned straight under the hips (not shoulders) with feet facing straight on. This is a very similar position to an Archery stance, which I am familiar with. This stance could be hard for people with stiff necks, because it required a full 90 degree neck turn to get the eye lined up with the target. Even a 5 degree tilt of the feet from target, keeping them parralel, helps alleviate this, but it means that the gun grip position must change to aim it correctly at the target.

One of the hardest things to remember is lifting the arm up so that it is aiming in the correct position without straining. I find it too easy to move my arm left or right to sight the target, rather than moving the feet (I'm talking about 1cm foot movements here..) The problem with this is that it then requires a wrist tilt to see the sights correctly. One exercise I do to get the correct line up in exercise is to line up the feet correctly and start rotating at the hips left and right with arms stretched out. As you lets the momentum fade, but keep your arms straight, you will eventually settle into your bodies relaxed aiming position. You can then move if this is not pointing at the target. It's a bit flamboyant, and not something you'd do all the time, but it helps train muscle memory for when you need it.

As far as where to stand goes, I find that the centre of target line passing through the centre of the ankles (and shoulder) is about the right place. Any adjustment to body angle requires moving to the side so that the firing arm stays straight down the centre. If you don't do this then I guess you end up needing to sideways tilt the gun, or your wrist (which I don't think is a good idea)

When I find my best position I'll update the post.

Monday, October 24, 2005

Tampering with the grip.

The LP10, like most top end air pistols, has an adjustable grip, allowing you to change the horizontal and vertical aligment in relation to the barrel.

I haven't had my gun long, so didn't place any thought into making any adjustments at all, until reading a post at Pilkguns about grip adjustment and Rake Angle: How to make your new gun user-friendly. I performed the test of holding the gun straight out in a comfortable straight arm straight wrist position, and the gun was aiming a good 35-45 degrees up from my arms and fingers (which were pointing roughly towards the target). This is when I really paid attention to what I was doing to get a good shot off with a straight head and eye. I was tilting my wrist forward pretty much as far as physically possible to get that front sight in line with the target. I also had to lift my arm higher to get in line with my eye.

I quickly got the tools out and did a beginners course in adjusting the grip. The manual didn't really say anything at all about what to do. It pointed at 6 screws and said adjust these to measure. Having adjusted pool tables to sit on unsteady floors in my time, I luckily worked out what to do with the 4 screws at the bottom. I left the front 2 alone, and released the back 2 as far as they would go, while still staying solidly attached, and then tightened the grip back on. Sure enough, my repeating the above test found that the sight was now more like a 10-15 degree incline from the arm. Shooting felt instantly more comfortable. My arm lowered at least an inch from before, which helps the shoulder, and my wrist doesn't ache as much. I am tempted to see if I can get any more leverage out of those screws, or even find a replacement set with 2mm extra thread on them.

Please bear in mind that I am 195cm tall, with long arms, so all the adjustments seem smaller to me because of the long arm to eye distance. A shorter person would feel like a lot more configuration was available on the Air Pistol.

I considered the option of adjusting the horizontal direction of the grip to adjust for possible stance changes, but opted not to. My opinion is that the more inline the arm is to the grip, trigger and barrel, forming as close to a perfect plotted line the better. This is an opinion based on trying to eliminate as much sideways forces as possible when tensioning the trigger. I have been trying all sorts of small adjustments in stance and posture and I found quite a few that all may be an acceptable position. Only time will tell if the most comfortable stance will require a left/right grip adjustment.

Wednesday, October 19, 2005

Opening up the sights


When I first opened up my Steyr LP10 I was pleasantly surprised with how well everything worked. So much so that I never really paid attention to the positioning of the rear sight. The Steyr LP10 has an adjustable width rear sight. As you will notice in Aiming The Pistol the perceived gap between the sides of the rear-sight front-sight is actually quite small. I had a gap on each side that was only around 1/4 to 1/3 of the perceived width of the front sight.

Today I was told on good authority by the New Zealand High Performance Pistol coach that I should open out my sights. He recommended that the gap on either side of the front side should roughly be equal to the front sight perceived width, as a minimum. (As seen above)

This basically allows more light to pass through to the eye, which will give a sharper contrasted sight picture. I definately noticed that the slight halo fog I had between my sights was gone, especially with my tired eyes today after no sleep.

I guess that the exact width is more preference than science, but science surely plays apart in how we see and focus our eyes on bands of light.

Results
I instantly noticed how much easier my eyes felt, a little more relaxed when focusing, and it was easier to tell that the front sight was horizontally centered (even though the gap was bigger). As can be seen from the image above, my grouping improved very much after the adjustment. Without embarrasing myself with a picture I can assure you that my groups were more like a spray across the 8-9-10 today before the adjustment. Thanks Ray for advise well given.


UPDATE:- Opening up the sights more.


Comparing this image to the one at the top you will see that the depth of the front sight, and rear sight blades is nearly twice as deep as the image above. The LP10 out of the factory had the rear sight depth set at the lowest setting, I have now opened mine up to the deepest setting. This lets a lot more light pass through the gap between sight blades, and it also makes it easier to tell if the front sight is bobbing up or down.

Sunday, October 16, 2005

Aiming the pistol (Focal Points)

In this topic I would like to cover aiming the pistol correctly at the target. Now everyone knows that you should point the gun at the bullseye and fire. When using open plain sights to aim there are 4 main focal points that you can achieve. Please read the material below to correspond with the images.

Focusing on the target. This allows you to see the target clearly, in the hopes of seeing where the shots lie. It's an instinctive need to look at what you want to hit, and in the case of pistol shooting very wrong. If you are looking at the target, then you cannot be looking at the sights (which is how you aim accurately.)

Focusing on the rear sights. This is a little closer to what you want. The target will appear blurry because your focal point is so close, but this is to be expected. The problem here is that the front sight is not well defined, which means it will be hard to consistently center the front sight within the rear sight,

Focusing on the front sight. This is what you want to achieve. The front sight is the focal point for aiming that all else should surround. The target is a blur, but its an even round blur, so that is ok. The rear sight is a little out of focus, but not too much, because the distance is small between it and the front sight. With the front sight sharp and clear it is easy to see the spaces are even to the left and right of the front sight. And easy to see if your sight is level, creating a nice bookshelf to rest the bullseye above.


Focusing Anywhere Else inbetween. You'll just get a headache and hit anything but what you want ;)
    Sight Alignment.
    Alignment is every bit as important as focus. without a correctly aligned sight, you shots will not break in close groups. as with the last image, you want to create an even geometry between the pistol and the target. Most people aim a little below the black centre ring so that the sights are easily seen. trying to focus blacksights over black target is very tricky business! A lot of the sight positioning comes from head, foot and body alignment. Match these 3 things with a steady arm and steadier wrist and you'll be banging out the 10's. Even a 1/2mm variance on the front sight (so that the width is greater on the left/right/top or bottom of the rear sights can create a 2cm (1 inch) difference on the target.


      Home 10M Target range

      Air Pistol is a practical sport for people who have only a limited amount of time during the week for training, as long as you have a useable space at home to shoot. Practical home shooting areas are backyards (with no children) and garages.

      For target air pistol you shoot at a distance of 10M. This is measured from the face of the target to the standing line. No part of your feet may cross the standing line. Personally, I have a garage setup which allows me to shoot a little over 9M. My opinion is that anything from 8-10M will serve as a good practice range, but when shooting away from 10M you will need to adjust the elevation of the rear sight when moving to 10M to get the same shot positioning. The target rests 140cm from the ground (this is measured from the ground to the centre of the 10 ring (bullseye.) An Air pistol target has a bulls eye of 11mm in diameter. The total size of the target is approx 15cm diameter. Scoring is measured to the highest value. This means that if your shot breaks the ring seperating the 9 and the 10, then you will score a 10. It's a good idea to score down when practising if it is hard to tell if the line was broken, so that you will hopefully be happier with competition scores, but not disappointed.


      This is a competition target. The card is measured 17cm square, and made of a fine short fibre paper-card that minimized tear when the pellet goes through. It is important to get a fine clear cut from the pellet to measure the score. As you can see from the picture below, the punched holes are quite clean.

      There are actually 4 shots on this target. 2 overlapping in the 10 ring. In competition only one shot is fired on each target. I normally shoot 5 per target when practising. Air pistol is also quite economical after your initial spend on a good gun. You can expect to pay around NZ10 cents per target, and good quality ammo is around NZ$10-NZ$15 for 500 rounds.

      Setting up a range.
      It is a good idea to make sure that you set up the target backed against a solid wall or fence. If you miss the target, you want to make sure that the pellet is not going to keep travelling and hit something. You'll need a pellet trap to stop/catch the pellets and hold the target firmly in position.


      This is the Gamo Cone Pellet Trap, which I have used for a while. I will be replacing it with a custom designed one that works a lot better. The idea of the cone is that pellets bounce into the resevoir at the back. I find 1 of every 2 at best stays in and the rest mess up the floor. It does do the main job of a backstop to absorb all the power. Its second fault is that its not designed for competition sized targets. If you are prone to missing the target all together you may want to surround this with a bigger catch area. This trap holds the target by sliding it into the frame. It's not very good design. I am using magnets to attach the target firmly onto my pellet trap.

      Lighting is very important. If you have too much, or not enough, then you cannot focus properly on the pistol sights. In daytime outside a bright overcast day is best, or sunny days without the sun in your eyes. Indoors a white light fluroesent tubes for the garage roof are better than yellow lights. And you will need to spotlight the target with a brighter light so that your sights get good contrast when aiming.

      Tidy up the pellets after shooting. especially if you have children or pets, because lead is poisonous if swallowed. Its a good idea to wash your hands after shooting too.

      Saturday, October 15, 2005

      PCP, Hand Pump or SCUBA tank

      There is so little real information about the hand pumps, and scuba setups for refilling the tank on your air pistol. Pilkguns has some good information if you are going to go scuba. What I found most annoying was the lack of information from anyone, including manufacturers, on how long, how hard and what effort is required to hand pump an air pistol.


      Most of the reviews I read on the internet put me off wanting to buy a hand pump in favour of getting a scuba tank with an adaptor. None of the reviews I found really gave specifics about hand pumps, but tended to describe it as an Exhaustive, time consuming effort.

      I checked out the scuba option in New Zealand. NZ$500 for a tank, NZ$160 for a K-Valve adaptor, and roughly NZ$6 per refill of air. No one really quantified how many refills you would get on one scuba tank. From what I gather you also get less refill each time because of equalizing pressures. You might expect 150 shots on the first fill, then 147, 144, and on until the pressure in the scuba is too low to be worth it, ie less than 100 shots per fill. I did not go the scuba way because of the excessive initial cost. (Lets face it, we cough up enough for the Pistol already.)

      Buying the hand pump was the best move ever. I got my Gehmann pump for NZ$200 and discovered the following about it.
      1. You need to keep slow, steady strokes, so as not to overhead the air tank (which is overheated from the energy of compressing the air. Also, do not allow the air to expel rapidly either, as this freezes the canister which is not the best either.)
      2. To pump the canister from empty to the 200bar maximum pressure for shooting required 80 medium to long strokes. The time to do this was around 8 minutes.
      3. They Steyrs operating range is 100bar - 200 bar, so you refill it when it is a little above 100 bar if you do not want to have your shots starting to droop on the target. Pumping from 100Bar to 200bar takes only 30 strokes and around 3-5 minutes.
      In summary I think its just plain crazy to say that this is hard or too much effort. In any sport it is important to keep fit. I would hardly say that a 5 minute warm-up every 1-2 days of shooting is a bad thing. The real technique is to not use your arms at the bottom of each stroke, but to apply some body weight to force the air in. This makes the task a lot easier. I also build the effort into my stretching routine, because I am very tall so the pump height puts a bit of strain on my weak lower back ( a pain that leaves quickly with stretching and exercise ;)


      The other real advantage to the handpump is portability.

      I hope this information helps shoppers and people new to the sport.

      Air Pistol, Initial Thoughts

      Well, I have had my Steyr LP10 for a couple of weeks now. To put is simply, this Airpistol is simply amazing to use. There is no doubt that many cheaper guns may be technically accurate enough when placed in a vice-grip to for shooting competition 10M pistol, but that is not all that makes the shot.

      Before purchasing my LP10 I used a Weihrauch HW 40 PCA air pistol which is a very accurate gun for NZ$350.00. The HW40 is a single-stroke pnuematic with a very low recoil. The biggest problems here are that your fingers are rubbed raw from continuously cocking the pistol for a shot, and the ambidextrous grip does not support a stable shot so well as a molded grip. The HW40 also had trouble keeping the rear sight accurately aligned ( I guess from the shock of pumping. ) My thinking is that there are many small things like this that make the difference between the average, and the excellent Air Pistol.

      The LP10 when fired has absolutely no recoil. This has a more important factor that accurate pellet firing. Generally the pellet is well on its way to the target when recoil takes effect. The biggest factor for me from Zero Recoil is that the correct sight picture is maintained during and after the shot. This seems to improve the minds training into keeping steadier, better groups.

      The next major difference I noticed is the length of the pistol. The Steyr is 30% longer than my HW40. This can add more forearm fatigue initially, but I noticed that it had the added benefit of stabilizing the shot. With the shorter barrel the lighter weight allowed the front sight to dip and waver more as you shoot longer, but the length and weight of the longer barrel helps to hold the pistol in position.

      Having the molded grip certainly helps keep a steady hand and positive alignment on the target. Overall I have noticed that my shots with the HW40 were along the following:
      10% (10 shots)
      70% (9 shots)
      20% random bad flingoffs into the 6-8 shot range.

      with the Steyr LP10 my shots have taken the following trend
      40% (10 Shots)
      50% ( 9 Shots)
      10% random bad flingoffs.

      I would attribute a lot of this to the overall ability to realign the gun into the correct position each shot because of the grip, sights and barrel quality. It doesn't seem like a lot, but its the simplest features that sometimes make the biggest difference.

      Lastly on the initial thoughts of the LP10. You can see the engineering quality. There are no frills to hide bad work, just a lot of beauty in the quality work. I expect this to be the last Air Pistol I'd ever need to become a champion competitor.

      Friday, October 14, 2005

      Air Pistol: Steyr LP10


      This blog is dedicated to my new competition match air pistol. The Steyr LP10. There is not a lot of information about this pistol on the internet for those who do not know about air pistols. Basically, Its one of, and possibly, the best Air Pistol in the world.

      The Steyr LP10 is a PCP air pistol. This means that it has a pre compressed air chamber (a mini SCUBA tank) attached to the gun, which is used to propel the lead pellets to the target. You can get between 120 & 150 shots before refilling.

      I will be displaying some close up photos of the Pistol so that you may see in detail what we are talking about. The LP10 is not just and air pistol... it is an engineering work of art.

      This is a side view of the LP10. it is quite a long pistol. around 40cm in length. Key Points to note are the PCP air tank directly under the barrel, the adjustable molded grip, and the super adjustable sights front and rear.

      The front side can be moved forward and backward between 2 slots to allow for a different focal lengh when sighting. Personally, I have found the out of the box settings on almost everything to be perfect.
      This photo shows the loading port where the pellet is inserted directly into the barrel. The side switch is lifted 90 degrees to expose the barrel. It might look fiddly to put the pellet in that little hole, but it is actually very very easy. I have large XL hands and found no trouble getting the pellets in. Sliding the switch back down closes the chamber and cocks the gun and readies the trigger. There is no safety on these guns so you must point the gun carefully. and fire the pellet.
      This shows the detail of the adjustable grip. Various parts can be adjusted such as the lower shelf to improve comfort of the gun.
      The rear sight is very easy to adjust with big knobs. If the pellet goes to the left, twist the side knob towards the L, Right goes to the R. The height adjuster is simarlarly configured with H and L for high and low.

      This image is of the loading port in the closed (firing position) There is also one other stage, with the side lever half down, for dry firing. This is to practise without wasting air, or shooting the pellet.
      This is the left side of the gun and grip (if you are left handed you must order a left handed grip). you can see the comfortable area for the thumb, and finger positions.
      Another image of the loading port ;)